FGTI-Distribution > Seals > Fitting Instructions
| Assembly instructions |

|
|
| Prerequisites for assembly |
The lead chamfers for rods, shafts and bores must be machined according to the specific mounting configurations of each seal profile type. Composite or elastomer sealing and wiping elements must not be passed over sharp edges, threads, transverse bores, grooves or rough surfaces. |
This absolutely must be validated during the design phase and monitored during assembly. If this has not been taken into account, surfaces that could damage the seals or scrapers must be covered during assembly. |
| Assembly instructions |
Before assembly, clean the mounting components and tools. Do not use tools with sharp edges during assembly. Also, observe the direction of use for single-acting seals during assembly. The seals and wipers can be greased or lubricated. Do not use mineral oils or greases, only silicone oil on elastomer parts and O-rings made of EPDM, SBR, IIR or CR. |
For the rod seals (particularly for profiles 231, 233, 234 and 238), ensure the groove is degreased. During assembly, there must be no traces of grease or oil, either in the groove or between the O-ring and the seal ring. At the end of assembly and for the first movements, the contact surfaces between the seal and the opposing surface can be oiled or greased to reduce friction. Calibration can also be done by the opposing friction surface (liner or rod). In this case, a correctly sized chamfer is required. If oils or greases are used, the compatibility of the materials must be ensured. |
| Installation of sealing elements in closed grooves. | When fitting seals with O-ring preloading in a closed groove, first insert the O-ring into the groove and then fit the seal ring. |
For the seals on profiles 314 and 354, it may be advisable to fit an O-ring and a sealing ring together in a single step. For composite joints, it is recommended to use assembly tools. |
| Without assembly tools | If the piston entry chamfers are correctly sized, the sealing ring can be fitted directly. Sealing rings are easier to fit if they are pre-heated in oil, water, or an oven to around 80-100 degrees. Ensure that the maximum temperature limits of the materials used are observed. |
The joint calibration is done by a calibration sleeve or a cylindrical tube. This is why a sufficiently large lead chamfer is imperative. The correct sizing of the lead chamfer is provided in the mounting dimensions specific to each seal. |
| With editing tool |
For the installation of exterior sealing profiles, specific mounting tools must be used, consisting of a mounting cone, a spreading mandrel, and a calibration sleeve. To avoid damaging seals and construction elements, assembly tools will be made from plastic with a good coefficient of friction, such as Polyamide, POM. During assembly, the sealing ring must be expanded as little as possible and only briefly. |
That is why a thin-walled mounting cone must be used. The quicker the assembly, the faster the sealing ring will return to its original dimensions in the groove. If the expansion due to assembly does not subside quickly enough, the seal must be recalibrated using a calibrating sleeve. If the lead chamfer is long enough, assembly can be carried out without prior calibration. |

|
Assembly and calibration of elements with external seals using specific assembly tools. | |
| Installation of external sealing elements in closed grooves |
When fitting preloaded seals with an O-ring in a closed groove, the O-ring is first inserted into the sealing groove, followed by the seal ring. For profiles 316 and 356 joints, it may be beneficial to fit the O-ring and the sealing washer together during assembly. |
For composite joints, it is recommended to use assembly tools. |
| Without tools (heart fold) |
Large-diameter O-rings can be fitted without fitting tools. Start assembly with the O-ring. Then bend the sealing ring «through the heart», avoiding folds. In this form, the ring can be easily fitted into the groove. The «heart» is unfolded to take its place in the throat. The final calibration is done by the calibration mandrel or by the rod if the chamfers are sufficient. The «residual fold» must be avoided, as it would be particularly unfavourable on small diameters at low pressure and could cause leaks. |
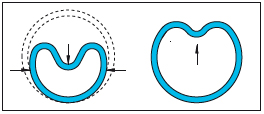 Heart fold for assembly
|
| With editing tools |
For the installation of internal sealing elements, it is recommended to use an assembly device consisting of an assembly sleeve, a punch and a calibration mandrel. To avoid damaging seals and construction elements, the assembly tools will be made of plastic with a good coefficient of friction, such as Polyamide or POM. 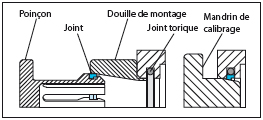
|
During assembly, the sealing ring should be expanded as little and as briefly as possible. For this reason, a thin-walled fitting cone must be used. The faster the assembly, the quicker the sealing ring will return to its dimensions in the groove. If the seal protrudes too much from its housing, it must be recalibrated with a sizing mandrel. If the lead chamfer is long enough, assembly can be carried out without prior calibration. Assembly and calibration of internal sealing elements with appropriate assembly tools |
| Assembly tools | For reasons of specific assembly conditions for each application and seal profiles, assembly tools cannot be supplied from the factory. | The tooling is customisable. In this case, an overall plan is essential. |
| Open throat mounting | Open groove assembly is preferable as it avoids any deformation of the joint. | For flanged or spring-loaded joints, open groove assembly is essential. |
Technical parts and high-value-added services
FGTI Distribution © 2024 All rights reserved
Legal information
Quality Policy
Terms and Conditions of Sale
Website by AroConseil